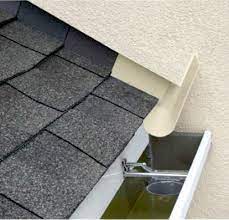
If you are reading an inspection report, you'll inevitably see the word "flashing." If you aren't a roofer or contractor, it can be a confusing word because flashing looks different depending on its application. Let's break down what these different roof flashing pieces are and their function.
Kickout flashing
Where: installed around chimneys and roof-wall intersections
Material: typically metal
Purpose: "kicks" or pushes roof runoff away from walls and/or into gutters. Prevents walls or windows below the roof from being splashed and continually wetted during rain events
Vent flashing AKA "boot"
Where: installed around vent pipe for gas appliances (oven, stove, water heater, or furnace) or plumbing vents (usually one bathroom has one vent for the sink, tub, shower, and toilet)
Material: rubber, plastic, or metal
Purpose: prevents weather and critters from accessing through the hole in your roof around the vent pipe


Step flashing
Where: installed along chimneys and roof-wall intersections
Material: typically metal
Purpose: allows water to drain around roof-wall intersections without wicking up the siding
Counter flashing
Where: installed along chimneys and roof-wall intersections on top of step flashing
Material: typically metal
Purpose: allows drainage at roof-wall intersections and prevents water from wicking up the wall. Counter flashing is needed for homes with brick/masonry, stucco, and EIFS exteriors.
Chimney flashing
Chimneys have the most flashing because there are four sides to protect.
Head flashing - installed on the uphill side of your chimney
Step flashing - sections that stair-step down along the side of your chimney
Counter flashing - sections installed on top of the step flashing
Apron flashing - installed on the downhill side of your chimney

If you still have questions about flashing, please contact Honeybee at honeybeehomeinspectionllc@gmail.com or on social media by clicking on any of the icons below


Comments